opkg update
opkg install relayd

/etc/init.d/relayd enable
Als Nächstes bearbeiten wir die Konfigurationsdateien.
dhcp
...
config dhcp lan
	option interface	lan
	option start 	100
	option limit	150
	option leasetime	12h
	option ignore 1

config dhcp wan
	option interface	wan
	option ignore	1
firewall
config defaults
	option syn_flood	1
	option input		ACCEPT
	option output	ACCEPT
	option forward	REJECT
# Uncomment this line to disable ipv6 rules
#	option disable_ipv6	1

config zone
 option name lan option network 'lan wwan' option input ACCEPT option output ACCEPT option forward ACCEPT

config zone
	option name	wan
	option network 'wan'
	option input	REJECT
	option output	ACCEPT
	option forward REJECT
	option masq 1
	option mtu_fix 1

config forwarding
	option src		lan
	option dest		wan
...
wireless
config wifi-device 'radio0'
	option type 'mac80211'
	option macaddr '00:00:00:00:00:00' # Ваш mac адрес
	option hwmode '11ng'
	option htmode 'HT20'
	list ht_capab 'SHORT-GI-20'
	list ht_capab 'SHORT-GI-40'
	list ht_capab 'RX-STBC1'
	list ht_capab 'DSSS_CCK-40'
	option country 'RU'
	option disabled '0'
	option txpower '20'
	option channel 'auto'

# Client for Netgear WNR3500L
config wifi-iface
	option device 'radio0'
	option network 'wwan'
	option mode 'sta'
	option ssid 'Netgear'
	option encryption 'psk2'
	option bssid '11:11:11:11:11:11' # MAC адрес точки доступа
	option key 'keynetgear'

# Access Point MR3020
config wifi-iface
	option device 'radio0'
	option network 'lan'
	option mode 'ap'
	option ssid 'OpenWrt'
	option encryption 'psk2'
	option key 'keymr3020'
Hier ist alles einfach: Dem Client-Modus wird der Access-Point-Modus mit eigener Verschlüsselung, SSID usw. hinzugefügt. Wenn dieser Modus nicht benötigt wird, löschen Sie den Access-Point-Block (oder kommentieren Sie ihn aus).
network
config interface 'loopback'
	option ifname 'lo'
	option proto 'static'
	option ipaddr '127.0.0.1'
	option netmask '255.0.0.0'

config interface 'lan'
	option ifname 'eth0'
	option type 'bridge'
	option proto 'static'
	option ipaddr '192.168.2.1'
	option netmask '255.255.255.0'
	option gateway '192.168.1.1'
	option dns '192.168.1.1'

config interface 'wwan'
	option proto 'static'
	option ipaddr '192.168.1.55'
	option netmask '255.255.255.0'
	option gateway '192.168.1.1'
	option dns '192.168.1.1'

config interface 'stabridge'
	option proto 'relay'
	option network 'lan wwan'
	option ipaddr '192.168.1.55'
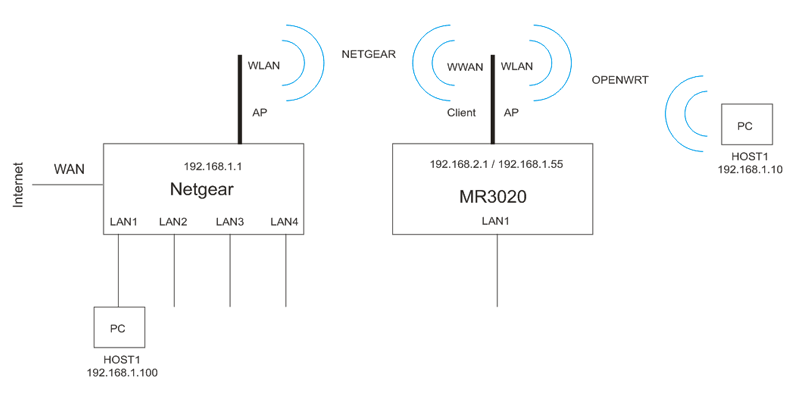
Hier hat der Router zwei IP-Adressen:
eine interne für das LAN aus einem anderen Subnetz: 192.168.2.1
und eine externe für WWAN: 192.168.1.55
Der Daemon relayd ist für das Umschalten zwischen dem internen und externen Netzwerk verantwortlich.
Er macht diesen Prozess transparent, sodass wir das Subnetz 192.168.2.x nicht bemerken.
root@OpenWrt:~# ps
....
4258 root       888 S    /usr/sbin/relayd -I br-lan -I wlan0-1 -L 192.168.1.55 -B -D
....
Was erhalten wir am Ende:
Ein Host, der an das LAN oder WLAN (per Wi-Fi-AP) angeschlossen ist, erhält eine IP-Adresse vom Hauptrouter aus dem Subnetz 192.168.1.x. Der DHCP-Server mr3020 ist deaktiviert.
Das Subnetz 192.168.2.x ist vollständig transparent – wir nehmen es nicht wahr.
Und natürlich können wir von diesem Host aus problemlos im Netzwerk 192.168.1.x surfen, einschließlich des Zugriffs auf 192.168.1.55 und das Internet.