


Installing KVM
Finally, we get to install KVM virtualization, the QEMU emulator, and the associated tools.
Install the necessary packages:
# yum install qemu-kvm libvirt libvirt-python libguestfs-tools virt-install # systemctl enable libvirtd && systemctl start libvirtd
We will store virtual machine images in the new directory /vms.
# mkdir /vms
Add the appropriate context to our directory so that SELinux does not complain:
# semanage fcontext --add -t virt_image_t '/vms(/.*)?'
Check it:
# semanage fcontext -l | grep virt_image_t
/var/lib/imagefactory/images(/.*)?                 all files          system_u:object_r:virt_image_t:s0
/var/lib/libvirt/images(/.*)?                      all files          system_u:object_r:virt_image_t:s0
/vms(/.*)?                                         all files          system_u:object_r:virt_image_t:s0
Apply the changes:
# restorecon -R -v /vms
and verify that they have been applied:
# ls -aZ /vms drwxr-xr-x. root root unconfined_u:object_r:virt_image_t:s0 . dr-xr-xr-x. root root system_u:object_r:root_t:s0 ..
Okay, download the ISO image for the OS that will be installed on the virtual machine from the network, for example, the same CentOS 7 minimal for the future web server? Or Tails? Who knows :)
Creating the first virtual machine
After the above actions, a network interface virbr0 with IP 192.168.122.1 is created on the host for virtual machines:
# ip addr
A virtual network named default is also created:
# virsh net-list
 Name                 State      Autostart     Persistent
----------------------------------------------------------
 default              active     yes           yes
The network can be edited:
# virsh net-edit default

<network>
  <name>default</name>
  <uuid>745f121b-3c89-1281-a19a-aa62808c4241</uuid>
  <forward mode="nat">
  <bridge delay="0" name="virbr0" stp="on">
  <mac address="16:18:00:21:8c:15">
  <ip address="192.168.122.1" netmask="255.255.255.0">
    <dhcp>
      <range end="192.168.122.254" start="192.168.122.2">
    </range></dhcp>
  </ip>
</mac></bridge></forward></network>
For now, let's not change anything and create a virtual machine connected to the default network:
# virt-install
--network network=default
--name vm1
--ram=2048
--vcpus=1
--disk path=/vms/vm1.img,size=30,format=qcow2
--graphics vnc,password=vm1password
--cdrom /vms-iso/CentOS-7-x86_64-Minimal-1503-01.iso
--boot cdrom,hd,menu=on
Description of options:
--graphics vnc,password=vm1password
Here we specify the password and the ability to connect to the virtual machine's terminal via VNC. The password may appear in logs, so do not write anything important here.
--network network=default - connects our virtual machine to the virtual network named default (we are already familiar with it).
It could be --network bridge:br0, for example, if we had created a bridge named br0 for option number 2.
The command specified above can be entered immediately in a single line, whichever is more convenient:
virt-install --network network=default --name vm1 --ram=2048 --vcpus=1 --disk path=/vms/vm1.img,size=30,format=qcow2 --graphics vnc,password=vm1password --cdrom /vms-iso/CentOS-7-x86_64-Minimal-1503-01.iso --boot cdrom,hd,menu=on
After executing the command, you may see the following message:
WARNING Unable to connect to graphical console: virt-viewer not installed. Please install the 'virt-viewer' package. WARNING No console to launch for the guest, defaulting to --wait -1
We don't need it, since our virtual machine host does not have a window manager anyway. At least, that's how it is for me.
Starting install...
Allocating 'vm1.img'
                        |  30 GB  00:00:00
Creating domain...
                        |  0 B  00:00:00
Domain installation still in progress. Waiting for installation to complete.
Bravely wait. The process will take some time.
After the command completes, let's look at the list of virtual machines:
# virsh list
 Id    Name                           State
----------------------------------------------------
 2     vm1                            running
Virtual machines can be started (virsh start vm1), paused (virsh suspend vm1), resumed (virsh resume vm1), shut down (virsh shutdown vm1), and many other things can be done with them. So, the vm1 machine is running (you can check this with the command virsh domstate vm1). How do we connect to it?
Connecting to the virtual machine via VNC
In the previous step, you created a virtual machine, specified a CD-ROM with the operating system, and now what? How do you plan to install and configure the OS? Yes, there are options. You can prepare the infrastructure and upload ready-made images, etc. But we are learning, and we have nothing except the recently downloaded ISO disk image file from the internet. In fact, it’s not complicated. In the previous step, we specified the parameter "--graphics vnc,password=vm1password". This means that we can connect to the terminal (i.e., screen) of the virtual machine via VNC, for example, using TightVNC, by specifying the IP address of the virtual machine host and the port for connection.
Our virtual machine was assigned a VNC port. By connecting to it, we will see the "screen" of the virtual machine. To find out which port is assigned to a specific vm1, you can use the command:
# virsh vncdisplay vm1 127.0.0.1:0
This means that the VNC port is 5900+0=5900. If the result had been "127.0.0.1:1", the VNC port would have been 5901, and so on.
You need to connect to port 5900 on the virtual machine host. This port is open on the host, not on the virtual machine vm1.
By default, the virtual machine host (in our case, CentOS 7 minimal) should not allow connections to any port except SSH (22/tcp). I do not recommend opening VNC ports from the outside. It is not secure. In order to access the screen of the virtual machine from the Windows workstation on which I am configuring everything, I set up port forwarding in PuTTY: 5900 -> 127.0.0.1:5900.
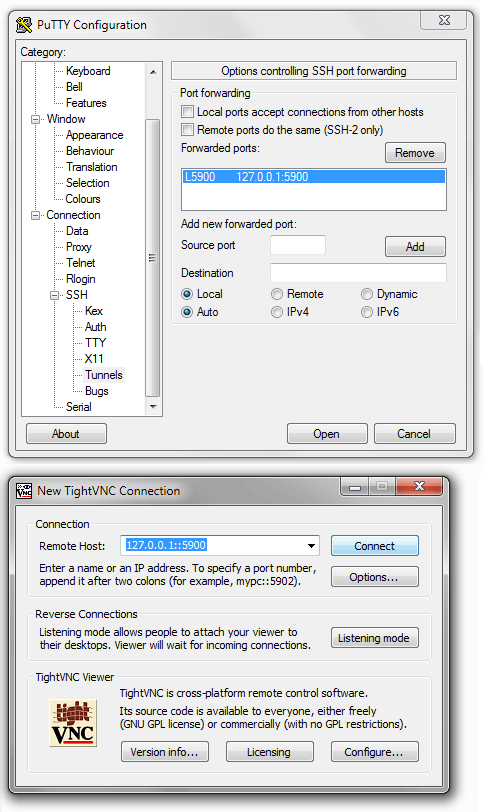
After a successful SSH login, you can launch TightVNC and specify the port 127.0.0.1::5900 (note the double colon).
If you need to reattach the ISO image to the machine after a reboot, you can do this with the command:
# virsh attach-disk vm1 /vms-iso/CentOS-7-x86_64-Minimal-1503-01.iso hdb --type cdrom --mode readonly
where hdb is the name of the CD-ROM block device. You can find this name by viewing the virtual machine configuration (virsh edit vm1).
You can manage virtual machines from the host using the virsh console suite. You have already become familiar with some of the commands. Type in the console:
# virsh help
and you will see how many things you can do.
Enabling/Disabling Virtual Machines
If you create a virtual machine and try to shut it down, despite the completion report, the machine may not shut down:
# virsh domstate vm1
running

# virsh shutdown vm1
Domain vm1 is being shutdown

# virsh domstate vm1
running
The issue here is ACPI support on the part of the virtual machine. In not all cases will the virtual machine process the shutdown or reboot signal (virsh shutdown/restart vm1). In this situation, the following options may be available:
Unplugging the power cable:
# virsh destroy vm1
Domain vm1 destroyed
You understand perfectly well what this can lead to. Although at the initial stage, while the OS is not installed, errors may appear.
Suspending the virtual machine:
virsh suspend vm1
It is not always necessary to shut down or reboot the machine from the outside. For maintenance, suspension may be sufficient. Not always, but still.
Enabling ACPI support in the virtual machine.
There may be different recipes here, for example, as follows (execute inside the virtual machine, not on the host):
yum install acpid chkconfig acpid on service acpid start
Virtual Machine Autostart
To automatically start the virtual machine vm1 upon host reboot:
# virsh autostart vm1 Domain vm1 marked as autostarted
To disable autostart for vm1:
# virsh autostart vm1 --disable Domain vm1 unmarked as autostarted
Monitoring network activity of a KVM virtual machine
Evaluating the network activity of a virtual machine can be useful—for example, to determine how much traffic it has consumed. This can also assist in debugging network issues or identifying traffic leaks. For example:
# virsh domifstat vm1 vnet0
vnet0 rx_bytes 3063962
vnet0 rx_packets 3412
vnet0 rx_errs 0
vnet0 rx_drop 0
vnet0 tx_bytes 591996
vnet0 tx_packets 1731
vnet0 tx_errs 0
vnet0 tx_drop 0
Everything here is clear except for how to obtain the name of the vnet0 adapter. You can find the network section in the virtual machine’s configuration dump (virsh dumpxml vm1) and look for the dev parameter within it:
<interface type='network'>
    <mac address='52:54:00:98:6c:e6'/>
    <source network='default' bridge='virbr0'/>
    <target dev='vnet0'/>
    <model type='rtl8139'/>
    <alias name='net0'/>
    <address type='pci' domain='0x0000' bus='0x00' slot='0x03' function='0x0'/>
</interface>
Connecting and disconnecting a CD-ROM drive
Attach an ISO image to vm3 as a CD-ROM:
# virsh attach-disk vm3 /data/vms-iso/CentOS-7-x86_64-Minimal-1511.iso hda --type cdrom --mode readonly Disk attached successfully
Be careful here, as after the path to the ISO file on the host, you must specify the CD-ROM device name for the virtual machine vm3. If you are unsure which device name to specify (hda, hdb, etc.), check the virtual machine’s configuration:
# virsh edit vm3
Detach the ISO image (do not remove the device from the guest, but simply “eject the CD from the drive”):
# virsh attach-disk vm5 "" hda --type cdrom --mode readonly